I listen to podcasts. I watch videos. I watch podcasts of different languages. But more than anything I read and write. I practice languages. That’s just how I roll.
Frequently I want to save an audio snippet or video clip for future reference. Sure I could save the source media file, if I had unlimited disk space. But what I usually do is keep a link to the original source and text synopsis of the snippet. That both saves on storage and makes future searches for that particular item simpler.
If you’re like me, you really want the original text more than a synopsis. It take s a bit of extra effort, but I have a nice solution that uses only a Mac and open source software. Read below for instructions on converting an MP3 audio file to a text document.
The Basics of Configuring Your Mac to Transcribe .MP3 Audio
Here’s what you need:
- The original media (.mp3 file, for example)
- Soundflower. Soundflower is an application that creates a virtual audio channel and directs audio input and output to physical or virtual devices.
- Audacity. Audacity is a free application for recording and editing sounds.
- TextEdit.app. TextEdit is the default text editor/word processor that is included in Mac OS X.
Follow the instructions on the developer websites to get all of the software installed and working on your system. Once you have the software installed, the next step is to configure your Mac to use Soundflower for dictation.
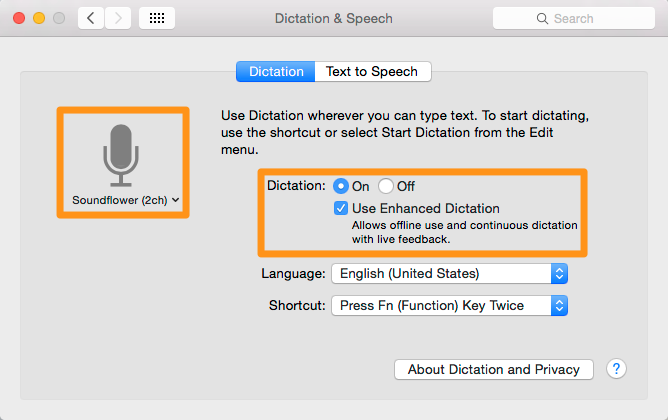
- Open System Preferences and click on “Dictation & Speech”
- Select the Dictation tab
- Select “Soundflower (2ch)” as the dictation input source
- Click Dictation to “On”
- Tick the “Use Enhanced Dictation” box
Your Mac is ready for dictation. When dictation is turned on in TextEdit (or a another word processing app), your Mac will transcribe sound from the Soundflower input source.
Getting Your Audio and Text Files Ready
Next, you need to queue up the audio file in Audacity and direct output to Soundflower. For those who are new to Audacity, this will be the trickiest step. But relax, you don’t need to learn much about Audacity beyond deciding what section of sound to play and how to select the audio output from the default speakers to Soundflower.

- Launch Audacity
- Import your audio file into audacity (File–> Import, or simply drag the file into the center of the Audacity screen.)
- Click the play button to give it a listen, then click stop once your confident you have the right sound clip/transcription area.
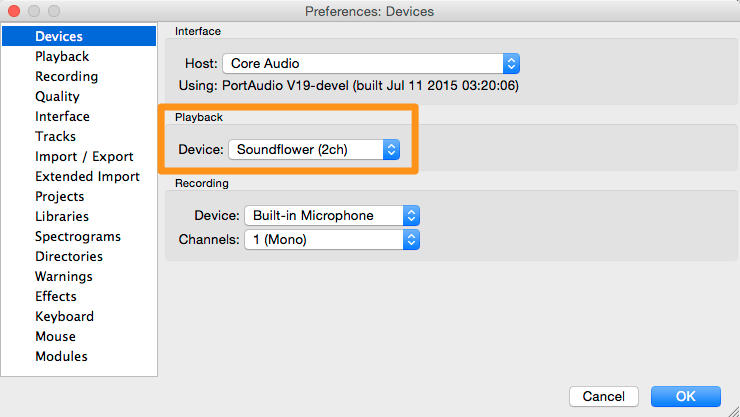
- Choose Audacity –> Preferences –> Devices. Under playback, choose “Soundflower (2ch)” to switch the output from the onboard speakers to Soundflower. Click “OK”
With Audacity and your sound file queued up, its time to turn your attention to TextEdit.
- Launch TextEdit
- Create a “New Document”
- You may want to add some meta data to the document, such as the podcast name, episode #, publish date and URL, to go along with the key transcript.
- Position the cursor in the file where you want the transcript to appear.
And … Action!
It’s time to start audio playback and dictation transcription. Here both sequence and timing are important:
- In Audacity, move the scrubber start location 10-15 seconds before the key transcription area.
- Press “Play.” The scrubber and meters will start moving, though you won’t hear any sound. The audio signal is going to Soundflower instead of to the speakers.
- Put focus on Text edit and position the cursor where you want the transcription to begin.
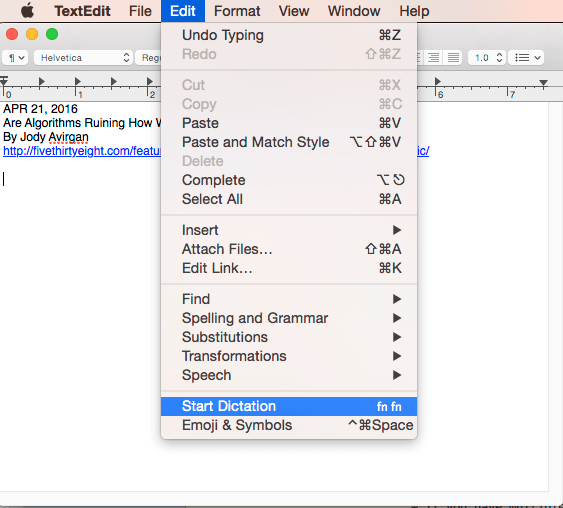
- Select Edit –> Start Dictation. (or use the hot key combination, Fn Fn). A microphone icon with a “Done” button will appear to the left of your document.
- Text will start appearing in the document. It will likely lag by about 3-5 seconds.
- After approximately 30 seconds press the “done” button. Transcription will continue until complete.
This is the fun part: watch as transcription happens in real time right in the document window. Look Ma, no hands!
And now you have the original text (and most likely a few errors) as text to save. In the future you can easily search and retrieve the information.
An Excellent Alternative: Google Docs Voice Typing
While the solution above works great for offline work, one alternative with a lot of promise is Google Docs. The Voice Typing feature work much like the dictation service in Mac OS. It has the crowdsourcing advantages and privacy disadvantages of other Google products. If you’re OK with that, I found Voice Typing to do an very good job with accuracy and it can go longer that Mac OS dictation.
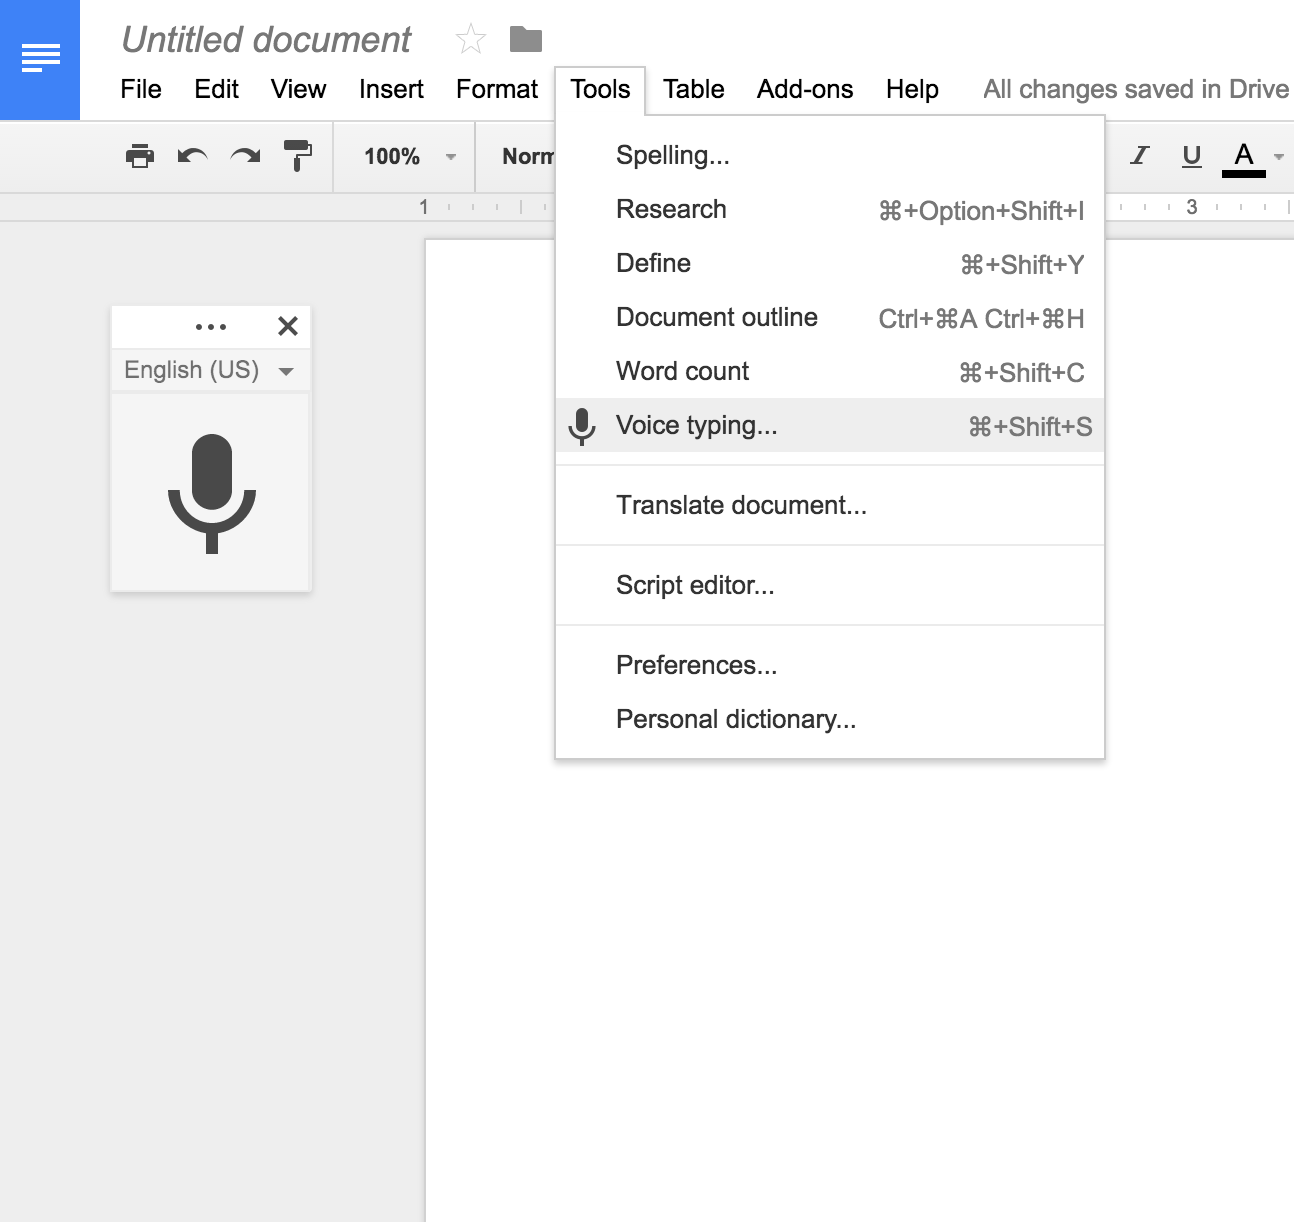
To use Google Voice Typing, follow all of the steps above with Soundflower, Dictation preferences and configuring Audacity. Instead of using TextEdit, you’ll want to start the Chrome browser and create a Google Doc. Once you are in document, Select Tools –> Voice typing
The user interface and process of starting and stopping transcription is the same as with TextEdit.
Dictation and Transcription Limitations
This process sets you well on you way to the goal of a high fidelity audio transcription. But it will be short of perfect. Here’s what you can do to go from good to perfect:
- Understand that Mac OS dictation transcription works for a maximum of 30 seconds at a time. If you need longer, you may want to use an alternate technology such as Dragon.
- Audio playback needs to start before dictation/transcription begins in TextEdit. TextEdit needs to be in focus for dictation to work. If you set the Audacity scrubber a few seconds ahead of target snippet, you’ll be fine.
- Transcription cannot intuit punctuation. You’ll need to add that after the fact.
- If you have multiple speakers or a noisy background, you may need to complete one additional step of creating a pristine audio file to work from. This can be done by listening to the sound through headphones and speaking the text into an audio recorder. Use the recording of your voice to drive the transcription.