I listen to podcasts. I watch videos. I watch podcasts of different languages. But more than anything I read and write. I practice languages. That’s just how I roll.
Frequently I want to save an audio snippet or video clip for future reference. Sure I could save the source media file, if I had unlimited disk space. But what I usually do is keep a link to the original source and text synopsis of the snippet. That both saves on storage and makes future searches for that particular item simpler.
If you’re like me, you really want the original text more than a synopsis. It take s a bit of extra effort, but I have a nice solution that uses only a Mac and open source software. Read below for instructions on converting an MP3 audio file to a text document.
The Basics of Configuring Your Mac to Transcribe .MP3 Audio
Here’s what you need:
- The original media (.mp3 file, for example)
- Soundflower. Soundflower is an application that creates a virtual audio channel and directs audio input and output to physical or virtual devices.
- Audacity. Audacity is a free application for recording and editing sounds.
- TextEdit.app. TextEdit is the default text editor/word processor that is included in Mac OS X.
Follow the instructions on the developer websites to get all of the software installed and working on your system. Once you have the software installed, the next step is to configure your Mac to use Soundflower for dictation.
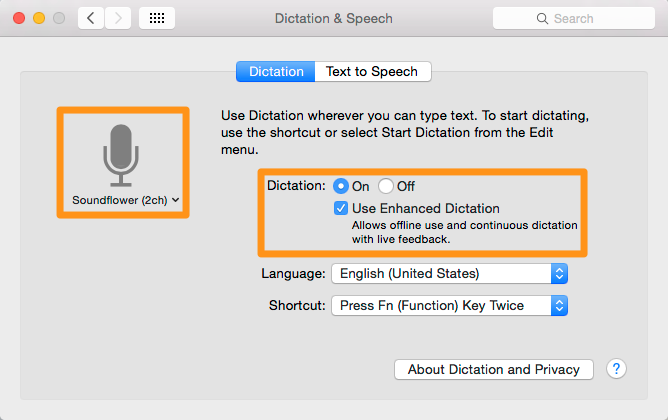
- Open System Preferences and click on “Dictation & Speech”
- Select the Dictation tab
- Select “Soundflower (2ch)” as the dictation input source
- Click Dictation to “On”
- Tick the “Use Enhanced Dictation” box
Your Mac is ready for dictation. When dictation is turned on in TextEdit (or a another word processing app), your Mac will transcribe sound from the Soundflower input source.
Getting Your Audio and Text Files Ready
Next, you need to queue up the audio file in Audacity and direct output to Soundflower. For those who are new to Audacity, this will be the trickiest step. But relax, you don’t need to learn much about Audacity beyond deciding what section of sound to play and how to select the audio output from the default speakers to Soundflower.

- Launch Audacity
- Import your audio file into audacity (File–> Import, or simply drag the file into the center of the Audacity screen.)
- Click the play button to give it a listen, then click stop once your confident you have the right sound clip/transcription area.
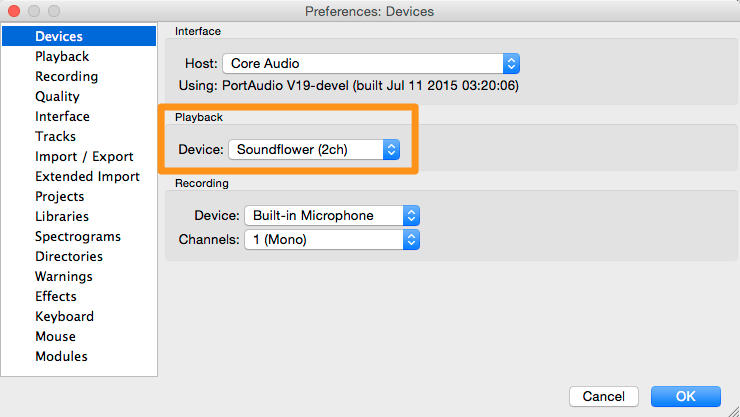
- Choose Audacity –> Preferences –> Devices. Under playback, choose “Soundflower (2ch)” to switch the output from the onboard speakers to Soundflower. Click “OK”
With Audacity and your sound file queued up, its time to turn your attention to TextEdit.
- Launch TextEdit
- Create a “New Document”
- You may want to add some meta data to the document, such as the podcast name, episode #, publish date and URL, to go along with the key transcript.
- Position the cursor in the file where you want the transcript to appear.
And … Action!
It’s time to start audio playback and dictation transcription. Here both sequence and timing are important:
- In Audacity, move the scrubber start location 10-15 seconds before the key transcription area.
- Press “Play.” The scrubber and meters will start moving, though you won’t hear any sound. The audio signal is going to Soundflower instead of to the speakers.
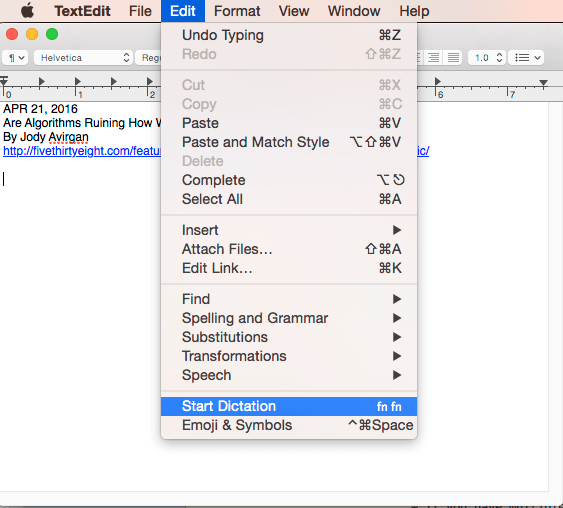
- Put focus on Text edit and position the cursor where you want the transcription to begin.
- Select Edit –> Start Dictation. (or use the hot key combination, Fn Fn). A microphone icon with a “Done” button will appear to the left of your document.
- Text will start appearing in the document. It will likely lag by about 3-5 seconds.
- After approximately 30 seconds press the “done” button. Transcription will continue until complete.
This is the fun part: watch as transcription happens in real time right in the document window. Look Ma, no hands!
And now you have the original text (and most likely a few errors) as text to save. In the future you can easily search and retrieve the information.
An Excellent Alternative: Google Docs Voice Typing
While the solution above works great for offline work, one alternative with a lot of promise is Google Docs. The Voice Typing feature work much like the dictation service in Mac OS. It has the crowdsourcing advantages and privacy disadvantages of other Google products. If you’re OK with that, I found Voice Typing to do an very good job with accuracy and it can go longer that Mac OS dictation.
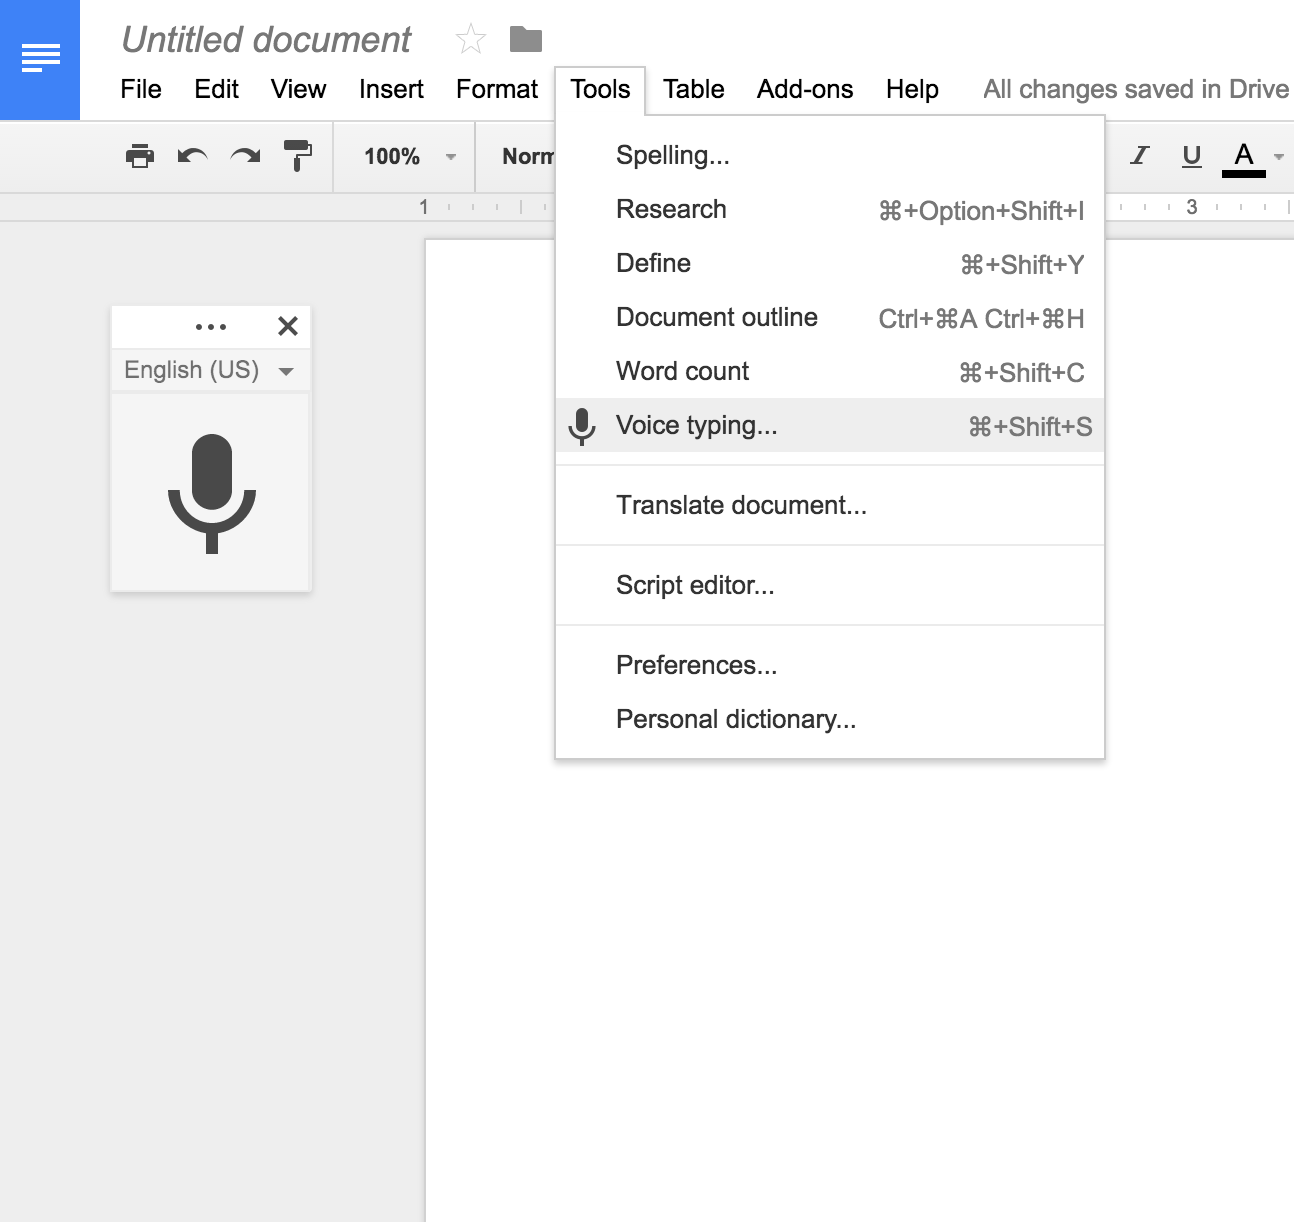
To use Google Voice Typing, follow all of the steps above with Soundflower, Dictation preferences and configuring Audacity. Instead of using TextEdit, you’ll want to start the Chrome browser and create a Google Doc. Once you are in document, Select Tools –> Voice typing
The user interface and process of starting and stopping transcription is the same as with TextEdit.
Dictation and Transcription Limitations
This process sets you well on you way to the goal of a high fidelity audio transcription. But it will be short of perfect. Here’s what you can do to go from good to perfect:
- Understand that Mac OS dictation transcription works for a maximum of 30 seconds at a time. If you need longer, you may want to use an alternate technology such as Dragon.
- Audio playback needs to start before dictation/transcription begins in TextEdit. TextEdit needs to be in focus for dictation to work. If you set the Audacity scrubber a few seconds ahead of target snippet, you’ll be fine.
- Transcription cannot intuit punctuation. You’ll need to add that after the fact.
- If you have multiple speakers or a noisy background, you may need to complete one additional step of creating a pristine audio file to work from. This can be done by listening to the sound through headphones and speaking the text into an audio recorder. Use the recording of your voice to drive the transcription.
Hi. I’m wondering if Express Scribe would be just as good as Audacity. I’ve been using ES (on a very old mac & need to re-download it on my new one as the version is outdated) but I’m used to it and already have a foot pedal for it. Tks..
I’m not familiar with Express Scribe. I did check out their web site and it appears their solution is aimed at users who are willing to type out the contents of the audio file. So I would say Express Scribe is more of an alternative than a complement to Audacity and the transcription process I describe.
Typing will lead to a higher fidelity result than what I discuss in this post. It also takes more time and effort. The choice is yours.
Thanks for replying, Bill!
Yes, Express Scribe is a typing transcription program. I just thought it might be the same difference somehow, but I didn’t look at Audacity closely enough I guess. I’ll stick with your recommendations then as my plan is to ease up on labourious typing and just do corrections.
Thanks… 🙂
I tried this by your instructions a bunch of times but never got it to work. I also tried setting input and output to sound flower, but again no luck. It’s a pity – i was hoping to transcribe speech for my English Language students to provide more concrete feedback on recordings of their speaking during presentations. I guess I’ll just have to listen and transcribe myself.
Sorry you are having trouble with the instructions Glenn. On a different point, I don’t think the use case you describe, especially if the speakers are learning pronunciation or speak with an accent, will result in success. I suspect you’ll find these transcriptions to require significant editing after the fact. Your use case is likely better served with human transcription.
It’s that Soundflower died. It is no longer. Other app option?
Thanks for pointing out that the link in my original post to Rogue Amoeba is now a bit confusing.
I’ve changed the link in the article to point to the GitHub repository where you can download the ready-to-use Soundflower installer.
SoundFlower continues to go strong and is compatible with Mac OS through Sierra
Please be aware these instructions are out of date. The excellent Soundflower is no longer being maintained, so I can’t encourage you to follow these instructions.
I’m currently evaluating two potential paths forward:
1. Use the US$99 commercial product “Loopback” from RogueAmoeba.
2. Find a free/open source alternative that is easy to use.
I’ll let you know what I learn.
I’m leaving this post active for readers that have the legacy 1.x version of Soundflower that includes the “SoundflowerBed” user interface.
Hi Bill,
Curious what you think of LoopBack. After a quick search on alternativeto.net, it appears to be the most viable option for Mac users. Would love to hear about your experience.
Cheers to your success!
Dan
Thank you for asking about Loopback.
I’ve completed my review of Mac-based audio utilities and the broader audio transcription landscape and have concluded that Loopback commercial software from RogueAmoeba is the way to go. It’s the only product (commercial, free or open source) that provides the needed functionality, on-going maintenance and support for mortals to succeed at automated transcription of .mp3 audio files.
There are also decent solutions for dictation (Dragon Professional commercial software from Nuance) and for typed transcription (oTranscribe free web solution).
I’m actively rewriting the blog post with instructions using Audacity and Loopback. The big changes are in the installation and configuration of Loopback. Additionally, I’m finding greater transcription quality improvements in both Mac and Google platforms. Either way, you should proceed using your favorite text/word processor.
I tried the Sunflower solutions and on day 2 it failed to work. Now, Audacity seems messed up. Help. I just downloaded the trial of LoopBack and cannot figure out how to get Audacity to recognize LoopBack instead of Sunflower. How can I get rid of Sunflower and have Audacity recognize LoopBack as my new intermediary. The Sound and Dictation elements of the MAC recognized LoopBack immediately.
Robert from Rogue Amoeba support quickly responded to my request for help. Following the instructions he gave I am now able to have Google Docs transcribe the podcast I play in iTunes:
“Try creating a new device in Loopback and select iTunes as a Source. Deselect the “Mute audio sources” checkbox.
Once you have created this device, launch System Preferences, navigate to the Input tab of the Sound section and select the device that you’ve just created to be your System input.
Then, open your Google Document, activate Voice Typing in the Tools menu, click on the microphone to activate the voice recognition and then hit play on iTunes. This should get you all set.”
You need to include the fact that the Voice Dictation source election has moved over to the Keyboard Preference – Dictation tab in MacOS High Sierra.
This is a great solution – it saved me $300 on Dragon. Granted Dragon will convert text in batch at machine speed where this converts in real-time. But the results were 99% for me using a good audio recording of my voice.
I tried getting this to work with GoogleDocs to no avail. My Macbook, Soundflower, and Audacity are configured per instructions. In GD you must click the mic icon once to tell GD to start receiving input. But after a couple of seconds, GD says “Sorry, nothing received. Click here to check the mic”. Seems GD knows nothing of Soundflower. This is a guess but it seems that TextEdit knows what to do because the Mac OS knows of the SF input/output. But how does GD know anything about a different input source? GD resides in the Cloud; not on the device. It’s looking to the mic for input and all it hears is silence. With its 30 second limitation, TextEdit is useless for dictation.
Please don’t promote Dragon Professional from Nuance, and don’t go buying it. They have discontinued the software (since October 2018) though it’s still for sale on Amazon and probably elsewhere too. They’re not providing any service or support for it and it doesn’t work in Mavericks. Customer support is appalling, and the telephone listed for UK support goes to an Indian call centre which seems to be a scam operation: I was asked for $100 to reset a valid, locked serial number (it needs reactivation every time you upgrade the operating system, and soon you run out of activations). They also wanted remote control of my mac. Needless to say, I declined the kind offer.